I haven't written in a few days, mostly due to the fact that I have been extremely busy, so I am sorry. Today is no exception, but I did come across a quote that I love so much that I just had to share. Take it to heart, and think about it. Because everything it says is complete true. I hope you all had a fantastic Tuesday!
This is Your Life.
Do What You LOVE,
and Do It Often.
If you don't like something, Change it.
If you don't like your job, Quit.
If you don't have enough time, stop watching TV.
If you are looking for the love of your life, stop;
They will be waiting for you when you start doing the things you Love.
Stop Over Analyzing,
Life is Simple.
All Emotions are Beautiful.
When you eat, Appreciate Every. Last. Bite. (and HELP those who can't)
Open your Mind, Arms, and Heart to New Things and People,
We are United in our Differences.
Ask the Next Person you see what Their Passion is,
and Share your Inspiring Dream with Them.
Travel Often;
Getting Lost will Help you Find Yourself (very true.)
Some Opportunities only come Once, SEIZE them.
Life is About the People you meet and the things You Create With Them.
So Go Out and Start CREATING.
Life is Short.
LIVE Your DREAM,
and always, always ALWAYS... WEAR YOUR PASSION.
xx,
Jaime

Tuesday, June 26, 2012
Wednesday, June 20, 2012
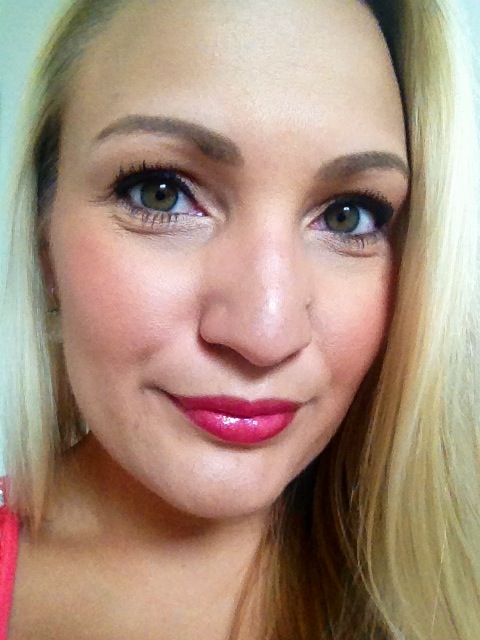
Makeup Inspiration: Lilly Pulitzer
Since today is National Wear Your Lilly Day, and I recently received a liquid eyeliner pen in my MyGlam bag, I thought, what better way to start out the day than with a Lilly Inspired Makeup Look?
I saved a picture from a few months ago when they started to release their summer line, so this is what I went off of. By the way, how absolutely adorable are those earrings? I need them!


I saved a picture from a few months ago when they started to release their summer line, so this is what I went off of. By the way, how absolutely adorable are those earrings? I need them!

I like that it is a simple look paired with a fresh eye with a slightly vintage feel.
What you will need:
*Regular Foundation/Powder Routine
*Contouring Bronzer (not too dark)
*Nude Color Eye Shadow
*Black Liquid Eyeliner
*Black Waterproof Pencil Liner
*Black Mascara
*Pink Blush
*Pink Lipstick/Lip Gloss
Steps:
1~ Do your regular daily foundation/powder routine
2~ Contour the hollows of your cheeks with a light dusting of bronzer (Tip: Make a fish/kissy face and place bronzer there). Also, bring it up slightly to your temples and then down under your jawline. Basically, anywhere you would naturally have a shadow. This helps create a more flawless and thin face.
3~ Brush your nude color eye shadow all over your lid and brow bone. I used a cream formula with a hint of gold shimmer.
4~ Line your upper water line with the black waterproof pencil liner. Be sure not to use the liquid for this as it is bad for your eyes, especially if you wear contacts.
5~ Line the top of your lid with the black liquid eyeliner, making it as straight as possible. Start from the inside, where your lashes begin and stop where your lashes end. Then, make a tiny wing (cat eye) with your liner and fill in to the line.
6~ Coat your top lashes with a few coats of black mascara
7~ Dust pink blush on your cheeks
8~ Top off with Pink Lipstick or Gloss on your lips and you're Lilly-fied!
"Life is a Party, Dress like it" ~ Lilly Pulizter
Happy 1st day of Summer!
xx,
Jaime
Tuesday, June 19, 2012
How To: Sock Bun
I recently wanted to learn how to do a sock bun for two reasons. One being that it's a super cute & easy way to keep your hair up off your shoulders for summer... not to mention the beautiful curls once you take it down, and secondly because you can wear it a little more polished for work (and hide your pink tips! hehe).
Here's what you do! It's pretty easy once you get the hang of it... just takes a little practice. I've also heard it works for almost any hair length as long as you can put it in a ponytail. My hair is pretty long, as you can see here.
What you will need:
*Sock with tube/ankle portion


Notice you can't see hardly any pink :)
Here's what you do! It's pretty easy once you get the hang of it... just takes a little practice. I've also heard it works for almost any hair length as long as you can put it in a ponytail. My hair is pretty long, as you can see here.
What you will need:
*Sock with tube/ankle portion

*Scissors
*Hair tie
*Bobby Pins
*Hair Spray
Steps:
1) Cut off the tube/ankle portion of the sock

It will look like this:

*Sorry I couldn't take pictures of these next steps, I didn't have anyone to take them and needed both hands, I hope my descriptions make sense!
2) Put your hair in a ponytail wherever you would like the bun to sit and secure with hair tie. I put mine kind of at the crown of my head, so you can see it when you look at me. You can also add a little volume on top by loosening the hair on the top of your head gently with a comb pick (I used a skewer because I don't have one of these - hah!)
3) Now, pull your ponytail upwards and slide the tube part of the sock (you cut off) over/around your ponytail. Start at the tip of your ponytail and roll your ends over the tube and tuck in the bottom. Continue to roll your hair down until you have rolled it all down and it looks like a bun/donut. It may get it a little messy, but that's okay, you can fix and tuck with bobby pins. If you have layers, like me, you may want to slightly hairspray or put pomade in your ponytail so your layers won't fall as easily.
4) Use bobby pins to secure any loose hairs and pin down your bun, if needed. My bun seemed like it would day without pins, but since I didn't want to worry about it, I added a few. If you are going for more of a casual look, you may want to loosen up the bun some and pull out hairs to frame your face.
5) Lightly spray all over with hair spray and Voila! Perfect & Easy Sock Bun!
 |
| Left to Right: Front, Right Side, Left Side, Back |
Notice you can't see hardly any pink :)
I hope this was helpful! Let me know if you have any questions. I'll be more than happy to help you out. Also, if you need a sock and live near me, I can give you one as I had to buy 3 pairs to do this... haha. I got mine at Target for $5.
"Everything is energy and that's all there is to it. Match the frequency of the reality you want and you cannot help but get that reality. It can be no other way. This is not philosophy. This is physics." ~ Albert Einstein
xx,
Jaime
Monday, June 18, 2012
MyGlam: June "Out All Night" Review
I recently signed up for MyGlam because I love trying out new products and thought it would be a fun, monthly "first look" type review to blog about for you guys. How MyGlam works is; You sign up on their website and get placed on their waiting list, once you're added (mine took about a month or so), they send you a "glam bag" every month full of goodies for 10 bucks! How fun is that? I was excited to get my first glam bag this month. Here is what I got!
The name of this bag is Out All Night :
Gold Glitter Makeup Bag

-Inside-
*Living Proof Nourishing Styling Cream & special discounted price for a Living Proof kit with Shampoo, Conditioner & the styling cream
*Philosophy Cream Moisturizer in Take a deep breath & coupon for free shipping on philosophy.com

Review:
*Living Proof Nourishing Styling Cream - "Stops frizz, weightlessly blocks humidity, smooths & conditions with no heavy silicones or oils"
- I liked the scent of the cream, reminded me of being at a spa. It went on nice and helped de-tangle my hair. But, since I have such fine hair, I found that it did weigh down my hair, especially when dry, and made it feel sticky in the extremely humid Florida heat. I probably won't use again, but it might work great if you have thicker hair that frizzes easily.
*Philosophy Cream Moisturizer - "A lightweight moisturizer that detoxifies and helps protect skin for a healthy-looking glow"
- I like the idea of this cream, using oxygen to revitalize your skin & spirit. I liked how it went on under my make up, very lightweight. It did cause me to get a little oiler in the afternoon, but I do have combination skin and it's been humid. Overall, I liked it and will probably use it up, not sure if I will purchase.
***
*NYX Lip Smacking Lipstick in Powder
 Review:
"Incredible color that resists wear and smudging, let your lipstick last all night with an amazing velvety smooth, mineral formula"
- I loved the formula of this lipstick, velvety smooth just like it says, and it lasted a long time. The color I got was "Powder" which is a powdery lavender color (swatch left). I do like the color, but probably won't wear it often just because I don't feel it is very versatile with my skin tone (olive). I think it would be gorgeous and more versatile on someone with fair skin. I will definitely purchase this lipstick in other colors though. You can find it at Ulta.
*Marbella Permanent Eyeliner Pen in 30 (Black)

Review:
"Master the art of beautiful eyes with this unique waterproof, smudge free and long-lasting semi-permanent eyeliner pen"
- I was very excited to get a liquid eyeliner pen. I have been wanting one to try out a Lilly inspired vintage cat eye look, but always forget to pick one up. I loved this pen. The tip is precise and soft, the product goes on nice and is dark, but not too black. It gave me the perfect cat eye. I love it! I will most likely purchase when it runs out.
Glam bags consist of trial & full size products. The first two were trial size and the last two were full. I hope this was helpful, especially if you are looking for a product like these or just enjoy trying new things like me!
"God changes caterpillars into butterflies, sand into pearls and coal into diamonds using Time & Pressure. He's working on you, too" ~ Rick Warren (Author of Purpose Driven Life)
xx,
Jaime
The name of this bag is Out All Night :
Gold Glitter Makeup Bag

-Inside-
*Living Proof Nourishing Styling Cream & special discounted price for a Living Proof kit with Shampoo, Conditioner & the styling cream
*Philosophy Cream Moisturizer in Take a deep breath & coupon for free shipping on philosophy.com

Review:
*Living Proof Nourishing Styling Cream - "Stops frizz, weightlessly blocks humidity, smooths & conditions with no heavy silicones or oils"
- I liked the scent of the cream, reminded me of being at a spa. It went on nice and helped de-tangle my hair. But, since I have such fine hair, I found that it did weigh down my hair, especially when dry, and made it feel sticky in the extremely humid Florida heat. I probably won't use again, but it might work great if you have thicker hair that frizzes easily.
*Philosophy Cream Moisturizer - "A lightweight moisturizer that detoxifies and helps protect skin for a healthy-looking glow"
- I like the idea of this cream, using oxygen to revitalize your skin & spirit. I liked how it went on under my make up, very lightweight. It did cause me to get a little oiler in the afternoon, but I do have combination skin and it's been humid. Overall, I liked it and will probably use it up, not sure if I will purchase.
***
*NYX Lip Smacking Lipstick in Powder

"Incredible color that resists wear and smudging, let your lipstick last all night with an amazing velvety smooth, mineral formula"
- I loved the formula of this lipstick, velvety smooth just like it says, and it lasted a long time. The color I got was "Powder" which is a powdery lavender color (swatch left). I do like the color, but probably won't wear it often just because I don't feel it is very versatile with my skin tone (olive). I think it would be gorgeous and more versatile on someone with fair skin. I will definitely purchase this lipstick in other colors though. You can find it at Ulta.
*Marbella Permanent Eyeliner Pen in 30 (Black)

Review:
"Master the art of beautiful eyes with this unique waterproof, smudge free and long-lasting semi-permanent eyeliner pen"
- I was very excited to get a liquid eyeliner pen. I have been wanting one to try out a Lilly inspired vintage cat eye look, but always forget to pick one up. I loved this pen. The tip is precise and soft, the product goes on nice and is dark, but not too black. It gave me the perfect cat eye. I love it! I will most likely purchase when it runs out.
Glam bags consist of trial & full size products. The first two were trial size and the last two were full. I hope this was helpful, especially if you are looking for a product like these or just enjoy trying new things like me!
"God changes caterpillars into butterflies, sand into pearls and coal into diamonds using Time & Pressure. He's working on you, too" ~ Rick Warren (Author of Purpose Driven Life)
xx,
Jaime
Friday, June 15, 2012
DIY: Makeup Brush Holder
A few weeks ago, I came across this idea on Pinterest to clean out your old candle jars and reuse them. What a fabulous idea! Especially since I end up with so many after Bath & Body Works has their 2/$20 sales (btw... Semi-Annual Sale going on now, lots of candles for $10!). My only thing was that I already have tons of lovely apothecary jars for my bathroom storage of cotton balls, q-tips, etc. Then it dawned on me, it would be a perfect brush holder! I have been searching for one, but didn't want to pay too much. What a great way to use an item I have already purchased!
So, I placed the candle, with little wax remaining, in the freezer for a few hours:

The hot water also made it really easy to roll off the sticker on the bottom too. Then, peel off the label on the front, clean up the glass with soap and water & dry it:


So, I placed the candle, with little wax remaining, in the freezer for a few hours:

After removing it from the freezer, I tried to pry the candle away from the glass with a dull knife, like the original instructions said. Not sure if it's just me, but this wasn't working and I didn't want to break the knife. So, I decided to place it upside down under the faucet and let hot, hot water run on it. Turns out, that was a great idea! I could hear the candle cracking after about a minute. After about five minutes, I took it out from under the hot water (be careful, the glass gets really hot too). It was so much easier to get the wax out, took about 2 minutes:
 |
| before & after hot water, big difference! |
The hot water also made it really easy to roll off the sticker on the bottom too. Then, peel off the label on the front, clean up the glass with soap and water & dry it:

Add a fine/small vase filler until the jar is about half full. I used crushed seashells I got from Joanne's but you can also use small beads, pearls, anything that will move easily for the brushes to go in, but won't stick to the handles.

Place in your brushes & Voila! You've got a DIY Brush Holder!

**Update on the Davines Red Alchemic Conditioner to add the pink to the ends of your hair. I loved the color and it didn't come off on anything. After one wash, it was a pretty cotton candy pink and after the second wash it was pretty much completely out. So, it is super temporary for those of you looking for weekend fun!
"Nothing is impossible. The word itself says I'm Possible" ~ Audrey Hepburn
By the way, it's National Flip Flop Day! So, kick off your shoes, throw on some Flip Flops and have a Fabulous Friday the 13th!
xx,
Jaime
Wednesday, June 13, 2012
Pretty Summer Pasta

I stumbled upon this pretty pasta the other day at HomeGoods and it was just too cute to pass up! I thought it would be perfect to "spice" up a pasta dish and give it a summery feel. I instantly knew what I wanted to make, a Shrimp Portifino inspired dish. So, I picked up a good bottle of EVOO (Extra Virgin Olive Oil), as Rachel Ray would say, and went home with a mission!
What I used:
* Torino's All Natural Mother In Law's Tongue (pictured above)
* EVOO
* 12 Fresh Florida Gulf Shrimp (Peeled, we did 12 for two of us)
* 2 Large Fresh Minced Garlic Gloves
* 1.5 c. Sliced Mushrooms
* Pine Nuts
* 1.5 c. Baby Spinach
* Salt & Pepper
* Bring water to a non-rolling boil (as per the package instructions)
* Place whole pasta in water. Work into water as it boils until completely submerged.
* Boil for 12 minutes or until al dente

While the pasta is boiling,
* Heat about enough olive oil to cover the bottom of your pan.
* Add as many pine nuts as you would like and roast them until they have slight brown marks. Be careful not to burn them. Add a pinch of salt if you would like. (I added quite a bit of pine nuts as both my husband and I love them)
* Add both cloves of Garlic and your Shrimp. Cook until shrimp are pink. Add a few sprinkles of salt & pepper.
* Add in Mushrooms and cook slightly. Be careful not to over cook or they will shrink down. You just want to knock the crisp out of them a little (if that makes sense?)
* Top with about 1.5 to 2 cups of baby spinach (it cooks down quite a bit) and cover until spinach has wilted.
 |
| taken before spinach, |
Drain pasta, place back in pot and gently stir in shrimp mixture. Top with about 2 tablespoons of EVOO & Voila, you have a light & pretty summer pasta dish!

You could also use chicken instead of Shrimp and if you're like me and you really love garlic, you could probably add another clove or two.
My husband and I both loved it! He said he felt like he was dining at a nice restaurant (I am sure he was just being nice), but it was good & fun! I do wish the pasta would have kept it's color a little more, but it did the trick! We didn't finish it all, but that just means I get to have it for lunch today, yipee!
"We can't become what we need to be by remaining what we are" ~ Oprah
xx,
Jaime
Monday, June 11, 2012
Pink Hair!
I am beyond excited to share that I now have pink hair!
Don't freak out ... Mom :), it's only the tips, sort of like a pink ombre look and I absolutely love love LOVE the way it turned out!

I wouldn't have pegged myself as someone to put a funky color in my hair, but when it started becoming a trend earlier this year, the more I saw it, the more and more I fell in love with the idea. So, I did some research on temp colors, went to my stylist, who I trust & adore, and she kinda shot down the idea...bummer. She said it probably wasn't the best idea with blonde hair because it can bleed up quite a bit. I was bummed, but I didn't want to end up with a whole head of pink hair, so I listened.
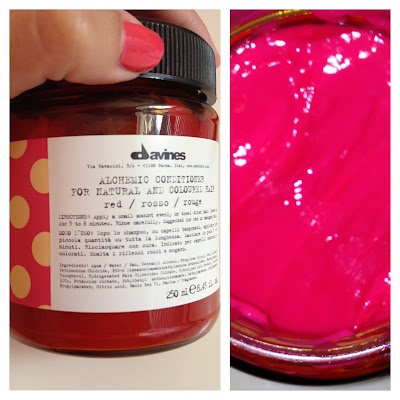
Then, a few weeks ago on Pinterest, I saw The Beauty Department's post on a conditioner that you can use on blonde hair for temporary pink tips. Wahoo! I had to get it.
I used Davines Alchemic Red Conditioner. It looks hot pink the container, pretty cool.

*Side note on my awesome, new iPhone case. I feel in love with this bird's nest look (yep, saw it on Gossip Girl), but didn't want the white, red or grey they sell in the apple store. Last week, I discovered you can buy tons of colors on Amazon for super cheap! I had to get hot pink, of course, but they have lots of other cool colors too. Check them out here!
Don't freak out ... Mom :), it's only the tips, sort of like a pink ombre look and I absolutely love love LOVE the way it turned out!

I wouldn't have pegged myself as someone to put a funky color in my hair, but when it started becoming a trend earlier this year, the more I saw it, the more and more I fell in love with the idea. So, I did some research on temp colors, went to my stylist, who I trust & adore, and she kinda shot down the idea...bummer. She said it probably wasn't the best idea with blonde hair because it can bleed up quite a bit. I was bummed, but I didn't want to end up with a whole head of pink hair, so I listened.
Then, a few weeks ago on Pinterest, I saw The Beauty Department's post on a conditioner that you can use on blonde hair for temporary pink tips. Wahoo! I had to get it.
I used Davines Alchemic Red Conditioner. It looks hot pink the container, pretty cool.

First, I washed and conditioned my hair like normal.
Then, I got out of the shower and applied the Red Conditioner where I wanted the pink to be.
*Tip: You don't have to use gloves, just be sure to wash your hands well as soon as you're done. I just kept a towel on and did my best not to let it touch the towel or my skin & leaned over the sink while I waited (and looked on pinterest -ha!)
I left it on for about 10 minutes. You can leave it on for less time if you want a lighter color.
Then, I hopped in the shower & it pretty much rinsed clear, not much color, which means it all stuck!
I blow dried and styled as normal. It's supposed to last about 3 washes, which is great if you want to just do it for a weekend or a special event.

 |
| please excuse the chipped nail polish:) |
*Side note on my awesome, new iPhone case. I feel in love with this bird's nest look (yep, saw it on Gossip Girl), but didn't want the white, red or grey they sell in the apple store. Last week, I discovered you can buy tons of colors on Amazon for super cheap! I had to get hot pink, of course, but they have lots of other cool colors too. Check them out here!
What I am Wearing:
*Striped tank from Mossimo/Target
*Pink shorts by Lilly Pulitzer
*Essie (chipped) Nail Polish in Cute As A Button
"Go confidently in the direction of your dreams. Live the life you've imagined." ~ Henry James Thoreau
xx,
Jaime
Thursday, June 7, 2012
Site Rave: Zappos
 |
| Pixlromatic Effects: Helena, Vignette & Clean |
I have never been too keen on ordering online for a few reasons; One, I love love love to shop, so I am pretty sure that I would quickly & dangerously get addicted, and Two, I like going to stores/boutiques, finding items and trying them on the good ole fashion way. Interestingly enough, that is exactly how I found the item that I ended up purchasing on Zappos.
I found these jeans on a girls shopping trip with my mother & sister in-laws and we decided someone had to try them on. Ended up, that someone was me! It worked out though, because they fit me perfectly and were adorable. Only thing was, I didn't really want to spend $150 on a pair of jeans in the beginning of Summer (trying to be realistic here.. haha...), and if I did, I really wanted one size down since the ones I tried on were on the cusp of being too big. So, I left them (sigh...) and decided I would see if I could find the size I wanted online for a better price. In comes Zappos!
To say I am impressed with Zappos is probably an understatement. I found the jeans immediately, during lunch, after we left the store and saw that Zappos had them on sale (meant to be...meant to be! hah) . So, I decided I needed to wait and decide if I really needed these jeans. Of course, you know what I decided. But, the impressive part was that I decided on Tuesday, actually ordered them at like 6pm, and they qualified for free, FREE 1-business day (overnight) shipping. First of all, who does that? No-one! So, I figured they would come Thursday (today) since I ordered them late, but nope! Literally, they arrived at my doorstep 24 hours later, impressive! And, if they don't fit or you don't like the item, Zappos pays for the return shipping! Now, if I would have known this sooner, I would have started using Zappos ages ago! I may be behind, but just wanted to share! Give it a try!
"Your journey has molded you for your greater good and it was exactly what it needed to be. Don't think that you've lost time. It took each and every situation you have encountered to bring you to the now. And now is right on time. ~Asha Tyson
xx,
Jaime
Wednesday, June 6, 2012
Makeup Review: bareMinerals Wanderlust Beach Collection
Since I love all things beach inspired, I recently picked up bareMineral Wanderlust Beach collection. They also have Wanderlust Tropics, Rainforest & Desert, but since it's summer I thought the beach collection made the most sense. Tropics might be fun too, which you can find at Sephora. Beach is exclusively for Ulta. I am absolutely loving the whole kit.
It comes in this super cute box and includes postcards reminiscent of 60's beach days.


It comes in this super cute box and includes postcards reminiscent of 60's beach days.

The kit includes everything pictured on the box:
* Tidal Wave Eye Color: Gilded Celadon shade. This color is the most gorgeous light green with flecks of gold with a hint of aqua. It gives you a wonderful fun, beachy mermaid look and will enhance almost any eye color. Since I have hazel eyes, it really brings out the green. I love this unique color and it will most likely be a summer staple in my makeup collection.
* Cabana Eye Color: Sultry, Sun-kissed toffee shade. This color is a gorgeous light brown color that accents the outer-v perfectly. It is also very pretty and gives a natural look when worn on it's own.
* Chic Radiance All-Over Face Color: Complexion booster instantly enhances your skin with a radiant sheen, bringing out a natural-looking, sun-kissed glow. I love this bronzer. It has a little shimmer, but not too much and does just what is promises, gives a natural-looking, sun-kissed glow.
* Round The Clock Waterproof Eyeliner in 9pm: Creamy, long-lasting liner in a deep, chocolate suede shade. This color goes on smooth, is a nice deep brown and stays put all day. If I had one complaint, it would be that because it's so creamy, it takes the pencil down a lot when you touch your eyelashes. So, I feel like it may run out faster than my usual eye liner. Other than that, I love it!
* Iced Champagne Natural Lipgloss: Shimmering nude shade with natural oils and capuacu butter. This is a gorgeous nude gloss with gold shimmer that will work on anyone. It doesn't get too sticky and smells like a sugar cookie!
All the products come in a cute, beachy green & cream striped travel bag.
Here is what the products look like on me. Sorry, no sun out today, but I did take the pictures in natural light. I have all the products on over my Summer Glow look I posted last month.

Here are the swatches of each product on my hand taken without & with a flash:

I hope this helps you if you are thinking of purchasing this kit or are looking for some fun summer looks. I definitely recommend these products!
"If you can Dream It, You can Do It" ~ Walt Disney
xx,
Jaime
Tuesday, June 5, 2012
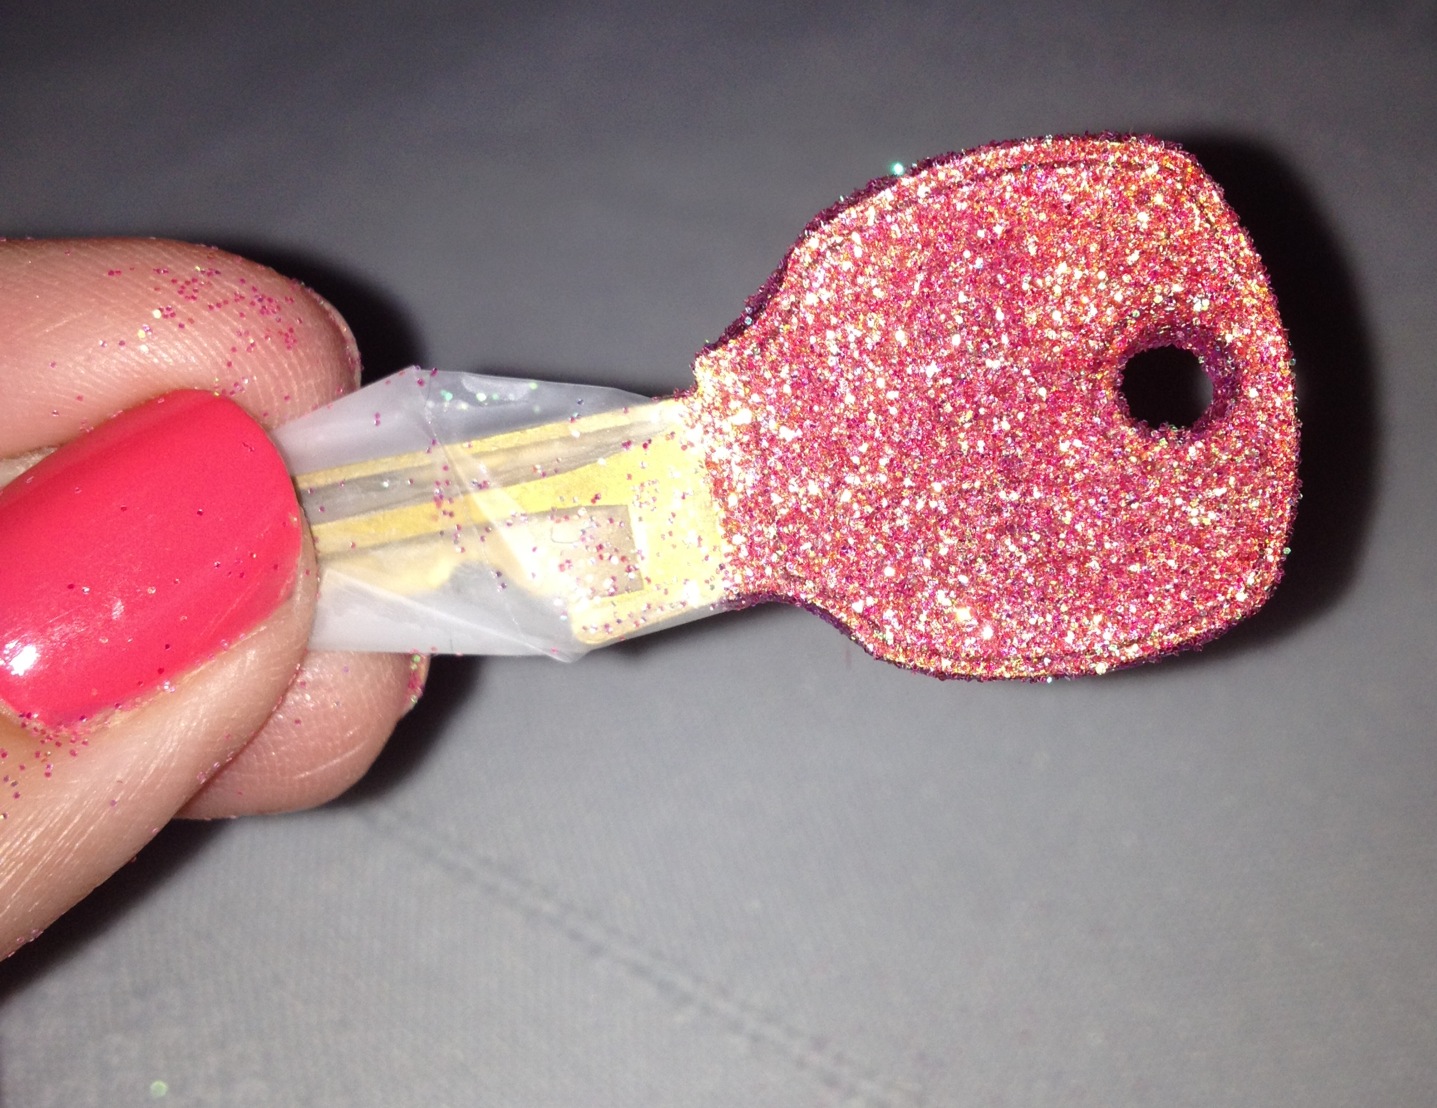
DIY: Glittery Keys
When I came across this idea a few weeks ago, I knew I had to do it! Bling out my boring house & mail keys? Yes, Please!
What you will need:
* Tape - I used regular scotch tape so it wouldn't leave much residue
* Craft Glue - I used Martha Stewart Crafts decoupage glue & sealer which I picked up a Michael's. I liked it because it has a brush on the end and I can also put a coat on after everything dries to seal the glitter.
* Glitter! - I used Martha Stewart Crafts Iridescent Glitter in Jelly Bean
* Keys
* Toothpicks - to clear out any glue/glitter that may get in the key ring hole
* It only takes about 5-10 minutes!
First, tape of the bottom part of your keys so that you don't ruin them.

What you will need:
* Tape - I used regular scotch tape so it wouldn't leave much residue
* Craft Glue - I used Martha Stewart Crafts decoupage glue & sealer which I picked up a Michael's. I liked it because it has a brush on the end and I can also put a coat on after everything dries to seal the glitter.
* Glitter! - I used Martha Stewart Crafts Iridescent Glitter in Jelly Bean
* Keys
* Toothpicks - to clear out any glue/glitter that may get in the key ring hole
* It only takes about 5-10 minutes!
 |

Second, coat both sides & edge with a thin layer of glue making sure it's smooth and you don't have any clumps. Clear out any glue that may be in the key ring hole with the toothpick.


Sprinkle all over with glitter (I did this over a paper plate)

Last, let them dry. If you have some styrafoam, you could stick the keys in that & let them dry. Since I didn't have any, I used rice & it worked really well.


And there you go, Pretty Glittery Keys!
What I am wearing:
* Essie nail polish in Cute as a Button
Some girls are just born with glitter in their veins ~
xx,
Jaime
Monday, June 4, 2012
Beach Bod: Healthy Seeds
If you are like me, you want to look & feel your best in your suit this summer. Whether you are in the privacy of your own backyard, the beach, pool or vacation it's important to feel good about yourself.
Last week, I learned about 3 little seeds that go a long way in helping you boost your energy, curb cravings, provide essential Omegas & keep your hair & skin glowing. If you are a subscriber to Healthy Bitch Daily (pardon the language - that's what it's called!), you may already be privy to these little seeds.
They are: Chia, Hemp & Flax (pictured below)


Chia seeds are wonderful for curbing your appetite. They hold up to 10 times their size in water, so they keep you full longer and give you that boost of energy to help pump up your workout. They taste pretty good too. They aren't too flavorful, so you can add them to almost anything or just snack on them so you don't end up eating something you'll regret.
All three seeds are full of antioxidants which help your skin from aging prematurely & reduce inflammation in your body. Add all 3 to your daily diet to help your get in your best shape for summer & beyond. You can add them to things like cereal, oatmeal, pancakes, smoothies, soups & baked goods. And, like I said earlier, I personally think they all are pretty tasty on their own. I think Hemp seeds taste similar to Sunflower seeds & Flax has a nutty flavor. Give them a try, you won't regret it! I found all 3 at M & M Vitamins near me, but I believe you can also find them at The Vitamin Shoppe which are located in most malls.
Here's to a healthy summer & life!
The best way to prepare for life is to begin to live ~ Elbert Hubbard
xx,
Jaime
Friday, June 1, 2012
Mermaid Nails

I have been loving limes & aquas almost as much as pink & coral this year, so I decided to pick up my first blue polish & my second green (the first was my mermaid's tears which mysteriously shattered).
Since I love all things beach inspired and have a slight obsession with mermaids, I decided to try a mermaid inspired look with my new colors. I used Essie's Mojito Madness (green) and Turquoise & Caicos which I topped with Shine of the Times to give an underwater shimmering effect.
What I am wearing:
* Aqua bead bracelet - Sophie & Trey
* Lime Cross bracelet - Sophie & Trey
* Lime Hair tie - Remington Anywear Hair tie shown here
* ONE Campaign white beaded bracelet
* Rhinestone bracelet - 4th & Ocean
"Twenty years from now you will be more disappointed by the things that you didn't do than by the ones you did do.
So, throw off the bowlines. Sail away from the safe harbor. Catch the trade winds in your sails.
Explore. Dream. Discover." ~ Mark Twain
xx,
Jaime
Subscribe to:
Comments (Atom)